Tuesday, November 22, 2005

Save the neck for me Clark!


We are off to my mom's for Thanksgiving! When I get back I have an exciting dessert to show that I made for last Sunday's dessert, I just didn't have time to do the post since it will be very involved! Another thing going on with me lately is my girl gang of crafty bitches (The Dixie Dolls) are holding a holiday bazaar the first Friday of December, so I have been working like mad to get stuff made for that and doing 'organizing an event' type stuff. I will be getting back into town next week but will be soo busy I won't have time to post again till the week of Dec. 5th. While I am at my mom's we have some big plans of doing some neat stuff, so I will have alot to show and tell! Hints: the dessert had flames and while at my mom's we will be seeing a museum dedicated to an icon of Christmas vintage kitsch.

>>


Monday, November 21, 2005

timmie!


I just got my Timmie stickers today! They are so cute! He is the creation of Marilyn Patrizio..Artist of cute stuff! Shown in the middle photo is her original painting of timmie. The one on the top is a happier timmie. You can shop her Etsy at :http://mpatrizio.etsy.com/
They are not waterproof though so I will have to look into covering them with some contact paper or packing tape then I will be covering stuff in need of cuteness! And in case you couldn't tell..He's a tadpole!

Saturday, November 19, 2005

7-up Emerald Isle Fluff

For last Sunday's dessert I made something from the "You're really cooking when you're cooking with seven-up!" cook booklet circa 1957. Lots of unusual ways to use 7-up for cooking such as basting meats and adding it to baked beans...If you dare. There are also ideas for using it in more acceptable ways like desserts, cakes and punches. I decided to try this recipe because it has coconut(and if you read this blog frequently, then you already know my love of coconut!) and for an added bonus..It calls for GREEN food coloring! Love it!

*********************************************************************
Recipe:
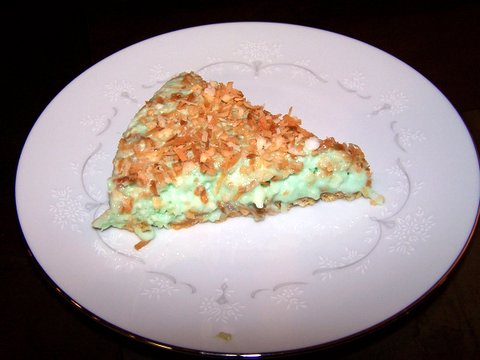
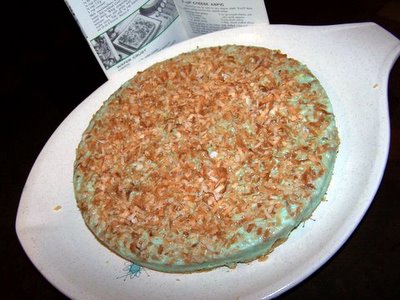
7-Up Emerald Isle Fluff
An airy dessert with the lively tang of the lemon-lime flavor of 7-up. (yes, it actually uses the word "the" twice like that)
1/2 lb. Marshmallows
1/3 cup evaporated milk
1/2 cup 7-up
1 cup coconut
1 cup evaporated milk, chilled until icy
green food coloring
melt marshmallows with 1/3 cup evaporated milk over hot water. Stir to blend. Cool; add 7-up and 1/2 cup coconut; chill until thick. Whip evaporated milk; fold in marshmallow mixture. Tint pale green with food coloring. Pour into wafer crust. Top with 1/2 cup toasted coconut. Chill until set (3 to 4 hours). Serves 9.
Wafer Crust
Combine:
1 1/3 cups vanilla wafer crumbs
1/3 cup melted butter or fortified margarine.
Then press in bottom of 8x8x2 inch pan. Chill thoroughly.
******************************************************************
I would love to say that the dessert went smoothly in the making but that would be a BIG lie. Did you know that coconut is extremely flammable? And did you know that those home fire extinguishers are really really messy? Yeah, well.... So after the fire was put out in toaster oven I had to start making the dessert all over again because the first one had a layer of fire extinguisher funk on it , along with half the kitchen. When I made the second batch of toasted coconut I watched it real close and when it was done it was starting to smoke and again threatening to play a rerun of earlier events. I am never toasting coconut again...Only problem is that there isn't anywhere around here that sells it. I will just have to improvise...Maybe I could fry it! You laugh, but that might be really good! Ok, then the other issue...Evaporated milk doesn't whip! I whipped it for a long time and it did absolutely nothing to the texture. I assumed "whipping it" would make it thick but no. I still poured it in the mixture and just put the whole thing in the freezer.
As far as taste goes..Everyone LOVED it! I should have made two of them because everyone wanted thirds.
There is a recipe for 7-up cake in the booklet also, which is a more popular dessert. It says to make a packaged cake using 7-up as the liquid in the recipe. And that's about it.

Friday, November 18, 2005

Hospice Rummage Sale

There are two sales that my town has every year that I plan waaaay in advance that I WILL BE THERE, and one of them is the Hospice Sale. It's actually a pretty big deal around here. The doors open at 8am but to be one of the first people through the door, I get there about 5 am(last year the guy that was first in line had gotten there at 12:30 am!!). And when I get there the line is already about 20-30 people long. The only way to make it through the long hours before it opens is to talk with the other crazy people, like myself, that get up crazy early just to stand in line to buy someone else's old crap! Everything is real cheap but it is an absolute madhouse in there! I think I got lucky though and got a bunch of neat stuff. Shown above is a vintage apron that has built in pockets/pot holders! Very neat but I don't think it's very practical..Imagine trying to get a heavy hot dish out of the oven and then that center area of the apron catches fire! Now maybe with the newer ovens this might not happen but I actually have a 1950's gas range and the area in the oven that has to be lit is right on the bottom, in front! So I think I will just be wearing this baby for show! Price: 50 cents.

Lazy Susan with ceramic hors d' oeuvres dishes, in one of my favorite shades of lime green!
price: 3.50


I bought this just for the box! Price: 1.00


I am a big vintage Fisher Price nut! I had never seen this village before but a few friends said they had it when they were little. It is soo fun! pumpkinbutt likes to put his hot wheels in it. Price: 1.25

I collect way too much stuff as it is, but one of my biggest collections is vintage Christmas items.
These are from the late 50's and early 60's. Mostly Christmas decorating ideas and crafts...Lots of Scrap Crafty things! Price: 25 cents each


lovely ornaments. Price: 30 cents for all of them


Some stockings that I am going to alter into ones for us and use as gifts! I actually like the names Bob and Ann on them and have thought of hanging them up as is! Price: 25 cents each


Felt apron, the boot is a pocket! Price: 25 cents


ok, now these type metal picture frames are the only thing I am actually looking for when I go to rummage sales and thrift stores. I love love love them! I also got a really big one but didn't take a picture of it . Price: 50 cents each for the ones show.

EEEEEHHHH (that's a squeal)! One of the finds of my life! I have been wanting a set of these style wooden salad bowls for soo long! I first saw them in some of my old cookbooks and decided that I must have a set so my salad would taste good and look beautiful. When I can find them listed on eBay they go for alot of $. These were priced a little higher than the normal hospice prices ($7) but I still think it was a good deal. Okay, now I'm looking forward to the library's used book sale in spring!

Wednesday, November 16, 2005

Scrap Crafty~Baby Monster

A friend of mine had a baby boy last week! Yeah! But he was early and I hadn't made him any gifts yet. So I decided that I should get something made for when we went up to the hospital that afternoon. Now, a sane person would have just done something simple when they only have a few hours to get or make a gift.. Something that they have done before a million times that way they know the outcome and that it's going to work...But oh no! Not me! I decided that I wanted to make the little guy something cuddly. And have I ever made a stuffed creature before, um NO! (now, I did start one a while back but lost interest (he still has no head!) and he wasn't very cuddly to try to finish up for a baby)

I put him up as the Scrap Crafty because he was literally made with leftover scraps from other projects. The fabric fro his body is leftover from Pumpkinbutt's Halloween costume, the green velvet ribbon and thread is from a bag of scrap notions from a thrift store, as is the fabric for his face.

I am definitely wanting to try my hand at making more of these type little guys and getting better. The original drawing and intentions I had of him were a little different, but pretty close to how he turned out. The face turned out just about how I envisioned it though. His eyes and mouth are embroidered and I wanted it to look like scribbles.

Friday, November 11, 2005

Lunchbox memories

Which one do I pick?Before I left to go to my mom's, I went to see a really cool exhibit of vintage lunchboxes on loan from the Smithsonian at our local art museum.

I really liked the images on the displays and their unusual shape.


I don't know anything about Dick Tracey but I was intrigued by this lunchbox. I think it has something to do with that mother and daughter having matching platinum blonde hair-do's and outfits ( I have NO idea what those antenna thingys are but they look neat)! There's a child with white hair playing a guitar. Then there's a granny looking lady with the same hair-do and she's wearing those yellow rubber dish washing gloves! And a Devo hat guy sticking his hand in the punch. It's just a very interesting scene...


Space age! I loved the two on the top. I would carry those around as purses or for small craftin' on the go!


The display for the western themed boxes. The image of the two boys glued to the television set is darling! Aww, the first couch potatoes!


Apparently HopAlong Cassidy was one of the first lunchboxes designed with characters on them.


I loved this set! My favorite thing about it is on the back there is a place for the owner to put their 'brand'! So clever! Makes me realize that I don't have a brand and I should come up with one.....hmm..

These lunchboxes were not by any means in mint condition, which really surprised me. I was hoping they would have had my old E.T. lunchbox but didn't. I wasn't able to get photos of all the boxes due to the fact that I don't think I was suppose to be taking pictures in the first place and I kinda sneaked to get these.

Tuesday, November 08, 2005

Scrap Crafty~'Spook' the Robot Spaceman

Spook the spaceman is a cute little guy made from tin cans. I found him in 'Better Homes and Gardens Christmas Ideas for 1959' magazine.
'Stretch your holiday budget with perky handmade toys'!
The can sizes could really be improvised to what is available as well as his decorative details. Original instructions are as follows:

Spaceman has four frozen juice cans for legs and arms, a large juice can for body, 1 pound coffee can for head. Spray with gold paint. Assemble with gold cord threaded through holes punched in cans. Features are colored gift tape. Antenna on head is a pipe cleaner. Hands and feet are fashioned from construction paper.

I personally hate just about anything gold colored and love silver so I would just ditch the whole gold spray paint suggestion and leave the cans as is! This would be a fun project for parents and children to do together and would be really cute as a decoration in a space themed room or a party.

Thursday, November 03, 2005

Hot Rod Kustom birthday cake

Here is a hot rod kustom birthday cake I made. The images are prints of old hot rod mags and a kustom rod. I covered the images in clear contact paper so the icing would not seep in and mess up the ink. The black stars are leftover royal icing stars I made for this wedding cake. The dice are plastic cupcake picks I got from a cake shop a while back. I thought the picks were neat but had no idea what I was going to use them for but now I think I need more, more, more! The plastic spider is of the typical Halloween staple type.  I also put real nuts and bolts around the top edge. I decided to put the whole 32 candles on the cake because I thought that would be cool looking with this fire thing going on behind the picture of the HOT rod! ( I generally put only enough candles for decorative purposes! ha ha). How did that go? Not too good! They started to warp the car on the top and threatened to catch it ablaze.
Now if the exterior of the cake wasn't animated enough, the inside has something going on also! I used the Betty Crocker ~Bake and Fill~ Cake pan set and  decided to put ice cream inside it:


It ain't too pretty, but tasted good! I will take some of the blame for this mishap though. I didn't have time to freeze it for HOURS after putting the ice cream in the center cavity. With this cake pan set it calls for 2 cake mixes however only about 1 1/2 are used. They recommend using the left over batter for cupcakes, which I made for Sunday's dessert.


I sprinkled them all with black sugar and then put a plastic Halloween detail on top. The severed witch's finger with a spider ring was my fave!

As you can see, I drag out Halloween for as long as I possibly can!