Wednesday, July 31, 2019

Beary Cosmetic Surgery


I don't put up much crafty stuff on here because crafty for me is mostly mending or fixing stuff up, like Mr. Husband wearing the ass out of a pair of shorts but since they are his favorite ones, I have to keep sewing patches on them.  You guys don't want to see that kinda stuff.
However I do have this sweet little mending/fixing up project to share.
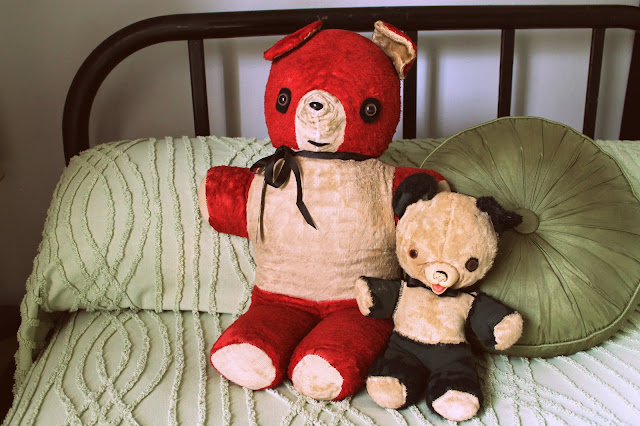
I picked up "Baby Bear" as we have been calling him at an estate sale for a couple of bucks to hang out with now named "Papa Bear".  Papa Bear had belonged to my stepdad as a kid..and well, Papa Bear didn't have a face.  He hadn't had a face for the entire time we have had him.  He's just been hanging out on our couch for the past 8 years with no facial features.  I guess that's kinda creepy but we just accepted him as he was. Since Baby Bear had a face it was time to give Papa one as well.  I went by a craft store and priced his bits.  It was going to be around 7 bucks, which I thought was a bit high for teddy bear plastic surgery.   Then, the next week, I happen to come across a bag of a bunch of assorted stuffed animal craft eyes and noses at an estate sale for just 2 bucks! Now I have enough eyes and snouts left over for any other future stuffed critters who stumble into our house with facial disadvantages.
His original eyes were higher up on his face from what I could make out, but I moved them down to match Baby Bear.  I also added some extra stuffing to his nose because it had become smashed down.  For his mouth I glued on a sliver of craft felt giving him a bit of an unreadable expression.

His pitiful before:


He's so cute now!


Believe it or not, it took PB and I some time to get used to him having a face!
PB says he liked him better without it.  That boy doesn't like change, even if it's for the better.  It's surely better to have a face!

Monday, July 29, 2019

Estate Thrift Sale Finds


Here is a group of fun stuff I picked up during a good day of estate sale-ing and thrifting.

Down the street from our home is a mid century house that I like to call Granny's house.  It has a nicely manicured lawn, beautiful brick, and the front door is painted my favorite shade of fern green.  When we went for walks and would pass by I would always comment on that being a great Granny house.  Well, I think you know where I am heading with this...Granny must have passed away recently, because the estate sale I went to was at her old abode.  It was kinda nice to get to see what it looked like on the inside, but wasn't as neat as the exterior.  The best part of the house was a huge addition behind the garage which was a rumpus room!  It had a huge pool table, a ping pong table, and lots of games, some toys.  I guess that's where she sent her kids/grandkids to get them out of her hair.  There was a window in the den that looked into the rumpus room so she could make sure no one was shooting an eye out or anything.
I found this Ring Toss game (3 bucks) in the rumpus room.  It's missing some rope rings but it's really great just for the box graphics!


Also got one of Granny's aprons (5 bucks):


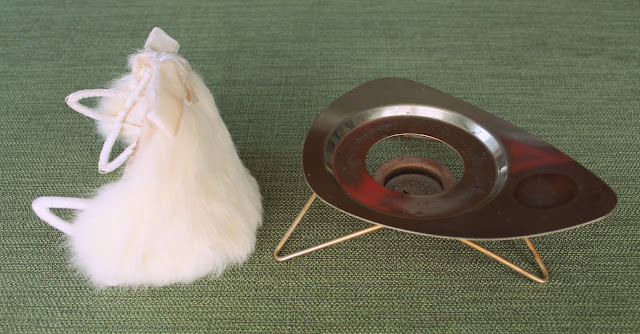
And a rabbit fur hat (7 bucks).  The metal warmer stand (2 bucks) on the right was from another estate sale I went to that same day.  It had a sticker on it that claimed it was 24 kt. gold...plated.  Whoppee dee do.  I couldn't get it to clean up well so I have since spray painted it black and am planning on using it as a little plant stand.


I got the Cafe' Du Monde coffee can (1 buck) from Granny's garage.  It was full of nails, screws, etc kinda stuff. I have turned it into a planter.  The measuring cups (1 buck) are also from Granny.  The mini micro planter (1 buck) came from the same sale as the "plant stand" above.  In the listing photo for Granny's sale, there were a set of Decoware tin canisters in turquoise.  I have been slowly compiling a collection of this color when I come across it cheap, which is pretty rare.  I have the waste basket and the serving tray.  I was about 5th in line and when I bee lined for the kitchen where they were suppose to be they were gone.  I figured someone else had nabbed them which I highly doubted considering the people ahead of me were slow moving old fogeys. I decided to ask the estate sale head and she told me that the night before the sale some of the family came in and grabbed stuff, including those canisters (which violates their contract) but oh well, what are you going to you do?


After I hit up the estate sales, I swung into a near-by thrift store and was quite surprised to find this vintage Asian couple ceramic figurine (3 bucks).  At one time there were either little bits of chain or cording connected from their shoulder harness to the black pots on their sides.  The pots are way too small to be planters so I am not sure what was originally intended for them...toothpicks?


{Also, Granny's was where I got these vintage vanity organizers.}

Not too bad for all of it adding up to about 25 bucks!

Thursday, July 25, 2019

The Haunted Mansion 1969 cake


For Mr. Husband Sir's Haunted Mansion birthday confectionery, I put together a homemade Hummingbird cake.  The first time we ever tried this cake variety was at Mammy's Cupboard, and it was divine!  It's got all of the good stuff: pineapple, banana, butter, pecans, and I added coconut (of course!).  This cake is so good it deserves a separate post all to it's self, so I will give the recipe in the future.


For the dripping effect on the sides and top of the cake I used this same glaze but added black food coloring to it.  I topped it off with purple, green, skulls, and bone sprinkles.

For the cake decorations I printed out and laminated a few Haunted Mansion iconic pieces.  The gargoyle candlestick holders which are in the Stretching Room are cleverly "holding" the birthday candles.  The little tombstones on top spelling out his name are prints of vintage souvenirs from Disneyland Park for the attraction when it first opened to the public.

The main cake topper piece is a print of the Hat Box Ghost holding Mr. Husband's head!  PB used his Photoshop skills to make it and did a great job!


Here's to 50 years of Happy Haunts and Hubs!


Tuesday, July 23, 2019

The Haunted Mansion 1969


Welcome foolish mortals... to the Haunted Mansion Birthday Party!

For Mr. Husband Sir's 50th birthday theme I choose one of his most favorite Disney Park rides, The Haunted Mansion, which also happens to turn 50 years old this year as well!

"Our tour begins here in this gallery..."


"Where you see paintings of some of our guests as they appeared in their corruptible mortal state..." 

I printed out large format copies of the stretching portraits and made frames around them with painted cardboard.  Hanging from above is a skeleton with a noose as a reference to the "Of course, there's always my way..." guy in the stretching room.


"Your cadaverous pallor betrays an aura of foreboding..."

Hidden Mickeys in the tableware, similar to the ballroom birthday scene.


"Serpents and spiders, tail of a rat, call in the spirits where ever they are at!"

I pulled out several of our Halloween pieces to decorate with such as the Madame Leota crystal ball I made a few years back.
Antique funerary candle stands flank the buffet with prints of the brass bats that adorn the roped queue area before boarding your doom buggy.


"Is this haunted room actually stretching? Or is it your imagination?"

On top of the sideboard are a few Haunted Mansion collectibles: a set of vintage Disneyland Haunted Mansion postcards, and 2 modern pieces (the ghost horse hearse and a doom buggy ride car).


"Beware of hitchhiking ghosts!" 

The hitchhiking ghosts are a large format print that I attached to a big piece of cardboard.  The 'wallpaper' is a roll of purple wrapping paper from dollar tree with 8x10 printed images of the Haunted Mansion design taped on.  I draped everything in old moss which I always keep a big bag of for Halloween decor.

I like to have Mr. Husband Sir's birthday theme be a surprise, which can make it a bit difficult with all of the making and setting up.  I keep everything I am working on in the (W)Rec room (as in Wreck room).  Which is what I call our garage turned laundry room, storage, and craft space because it's usually a wreck in there!  I then set everything up while he is at work so it's a big reveal when he walks through the door.  Oh and then there is the cake also...That's up next!

"If you would like to join our jamboree,
 There's a simple rule that's compulsory,
Mortals pay a token fee,
 Rest in Peace, the haunting's free,
So hurry back, we would like your company!"

👻👻👻

Some past posts with more Haunted Mansion:
Beware of hitchhiking ghosts! Halloween Costumes
Hat Box Ghost O Lantern

Past Mr. Husband B-day parties based after other Disney Rides:


Friday, July 19, 2019

Turquoise Fruit Baskets


I picked up all of these plastic baskets at a thrift store for 1 buck total.  I love the shade of teal/turquoise they are.  There is not a maker's name on them so who knows what other wonderful mix and match items that could have been offered to ''collect them all!'' to complete the set.
That little plastic onion head is one of my prized possessions.  I found it while rummaging through a box at an estate sale a couple of years back.  That was a great sale.  It is legendarily referred to as the "Chadwick" sale (the street name) around our house and among friends still.  The sale went on for 2 weeks because there was so much stuff.  I went to it on at least 3 separate occasions and still would find more stuff.  The picnic printed fabric in the last post was from that sale.
So was our dining room tablecloth.  And this cute Squeezit Bear.
And a bunch of other what-nots and doo dads I have never gotten around to photographing!
I may have to gather all of it together one day for a dedicated post because sales like that don't happen around these parts ever and it deserves a place in history!

Wednesday, July 17, 2019

Gingham Picnic Trays


I got these super cute vintage plastic gingham picnic trays (4) from a friend who runs estate sales.
They have a few small hairline cracks in them so I probably wouldn't trust them to hold sloppy joes or creamed corn but they will work perfectly for food photography, just as a serving suggestion!


This fabric is some I got at another estate sale a couple of years back.  It is 2 very long and narrow panels that I think were originally made to be curtain valences.


I took a few pictures to show all of the picnic action scenes!


I really love the color combinations and art styling!

I wish this fabric was bigger pieces, what a cute dress it would make!

Monday, July 15, 2019

Spicy Raisin Cornbread


I am so behind in writing up posts.  I think I have 30 or more sitting in draft form getting moldy. I made this Spicy Raisin Cornbread months ago and it is a faint memory.  I added the sugar icing glaze which the recipe did not call for.  Other than that I recall it being pretty tasty but a bit dry.  I would serve it with cool whip or ice cream to fix that issue if there was a next time.

This recipe came from
Pillsbury's Best 11th Grand National Bake-Off Cookbook, 1959, submitted by Mrs. Harry C. Druhl of Benton, Arkansas.


(click images for recipe enlargement)


 I thought it was an interesting idea with it being a sweet based cornbread rather than savory.  It would be perfect for brunch as a coffee cake.  The Bake Off booklet categorized it as a "bread" but surely with this much sugar it is a dessert! 

Friday, July 12, 2019

Curler Hamper and Hair Clips 'n Things


Here we are on the last day of Beauty Week on MHIcTy!
My most favorite vintage beauty find in the last year are these plastic lidded baskets for...


✴🟎✶"Hair Clips 'n Things"✶✵✴ and ✴✵✷"Curler Hamper"✴🟎✷!  They are most handy and I use them for what they are intended.  The hamper is large enough that I can also keep my hair net and head kerchief in as well.

Here is a more recent photo of my vintage styled hair.  I have my hair cut in a style called a "midi" which is the classic cut for vintage hair styling.  It shapes your hair in a slightly layered U shape, luckily for me my hair cutting gal knew what this was.  I have been dying my hair a red color for the past 10 months or so, which I really like.


a fairly decent looking side view:


I, by no means, feel I am accomplished enough to give advice or How-To instructions on hair styling, even after a year of learning.  Everything I have learned was from watching videos (see my Hair Color, Cuts, and Chattels Pinterest board for inspiration and the tips I used).  I also don't fix my hair every week if the weather is going to be bad (raining) or I have a big project going on like yard work or house painting, because why put the extra effort into it for raking leaves?!  But I will say that midi hair cut is rather boring looking unfixed.

For a bit more vintage hair, check out
my birthday last year where I had a Hair Party theme!
A Coiffure Affair Birthday Party


Thursday, July 11, 2019

Mirror, Mirror


Day 4 of Beauty Week on MHICty!
I picked up this vintage plastic hand mirror at an estate sale. I loved the pattern in the plastic, kinda like Formica cracked ice!


Here is a hairstyle from last summer where I left my hair long. I was in the process of growing my hair out for my Halloween costume that year and typically I have read that vintage hair styles do and look best when your hair is no longer than your collar bone.  Mine has about boob length at this point and I still had 3 more months I grew it out.


Last summer when I was working on learning vintage hair I spent a lot of time (hours every day!) trying to pull a style out of my curls.  I started to realize the styles I was trying to reproduce were on movie stars that had professional stylists at their call.  What did every day people back then do?  They had more simple styles and they didn't spend hours each day on their hair.
I now only spend between 30-45 minutes fixing my hair and make-up because I live in a real world and have shit to do other than my hair!  I just go more simple with it.  I brush out my set in the morning mostly directing it under, maybe sectioning a few parts into curls, and fluffing it up in areas where the curls are too dense and then doing something with the bangs.  At night I re-roll chucks in curlers to help keep the curl from drooping, cover my head in a hair net and a handkerchief.  If I am lucky I can keep a set going for almost a week.


Wednesday, July 10, 2019

Hair Nets and MiniPoo


Hello and welcome to Day 3 of Beauty Week here on MHICTy!
A couple more vintage beauty items I picked up over the last year are a set of hair nets (they still have their elasticity and are useable!) and this great little container of MiniPoo dry shampoo!
The MiniPoo was given to me by friends and the nets came from a yard sale.
 The MiniPoo still has nearly a full amount of product and came with the instructions and terry cloth comb cover.
It's probably made of powdered asbestos but I have full intentions of trying this stuff out!


My favorite vintage hairstyle is the Poodle Do. I worked on learning it through many attempts last summer.  It's a great style for hot and humid days, everything up and off the neck.  It is also perfect for pulling off a good look when you are on the last days of a wet set and curls are starting to get droopy.  And it's great for the first day of a wet set too since you can remove the rollers, quickly brush each section and pin it as you go. To accomplish this look you brush everything up and start pinning...lots and lots of pins, crowning around your head.  Then take sections from the top and loop them under with your fingers into curled sections and pin under.


The back can be difficult to make pretty without having eyes back there to guide you and all.  I have to just feel my way around and take peeks with a hand mirror periodically.  Above is a photo of one time it really turned out well.


This is another day I did the poodle do a bit more hasty but I liked how it turned out.

I have been doing a version this summer of the poodle do but much quick and easy by wet setting my hair the night before, the next morning brushing it out and sectioning off bangs, brushing up all the back into a high ponytail, pinning the edges of sections of the ponytail over and under, and fixing my bangs by rolling them together and pinning off to the side.


Tuesday, July 09, 2019

Wake Up Beautiful!


Day 2 of Beauty Week here on MhiCtY!
I found this vintage satin pillow cover at a thrift store for a mere 75 cents!
I would love to be able to just "wake up beautiful!"

I have not used it yet because when I wear my hair in curlers at night I have a handkerchief on my head thus rendering any magical powers of the satin pillow case unable to penetrate to my do.  Also since I dye my hair I don't want any dye to transfer and foul up this gorgeous print:


Today I am showing two hairstyles I did last summer that turned out fairly well.

This first one is a very high barrel roll bangs deal.
 I used a curling iron for most of the styling.


This second one I liked because of my little cute hat incorporated in:


Monday, July 08, 2019

Vintage Vanity Organizer


This week on MHICTY it's going to be all vintage beauty!  It has been a year since I started fiddling with doing my hair up in vintage inspired hair-do wet sets and such.  I thought it would be entertaining to show a few vintage beauty items I have picked up over the year along with featuring several of my somewhat successful styles.

I picked up these plastic bathroom drawer liners for cosmetics at an estates sale for 3 bucks each.  Although I don't have any drawers to line, I will come up with something to use them for.  I was even thinking about hanging them on the wall as shadow boxes for really light weight items.


That scalloped edge! 💖


I love this pixy stix looking gold print!

This hairstyle was the first one I did while messing around with my hair when Mr. Husband Sir and I were standing in the hot humid weather waiting in line for an estate sale.


My hair has a bit of a natural wave and the humidity was activating that up.  I just started winding up large sections and pinning them along with pinning the back up off of my sweaty neck.
It was a bit scraggly and had wild pieces going in every which a way but it sparked me to look up some 'right" ways to style hair.