Wednesday, October 19, 2016

Welcome to the House of Horror!


Step inside and mind the cobwebs.  It took me hours to get them hung just so!


We call this area the Parlor...the Funeral Parlor, that is!

Complete with an Embalming Certificate from 1933, vintage funeral parlor issued smelling salts, and a vintage metal 'Reserved for Funeral' sign!  Hop up on the slab if you need a rest!  

Next we come upon a secret chamber hidden in a bookcase.  Contained within are several old artifacts in keeping with the spirits.

 Speaking of spirits...a couple are approaching!
Let's duck into this nearby dreary expanse!

 Yikes! Keep an eye on these two, they can be a real pain in the neck!

 Maybe a little artificial sunlight will force them back into their coffins in the dungeons.  


I think they are taking flight!  Could have something to do with the garlic soup I ate for lunch though.

The rustling of bat wings within a lovely morbid cemetery wraps up our little excursion!

These are the highlights of my Halloween 2016 decor.  There are still a few other creepy corners I didn't photograph which contain framed tombstone rubbings, jointed paper skeletons, and lots of cob webs.  Every year I spend a load of time setting up everything, trying to make it a little bit different than the year before and improving the arrangements.  I am the most pleased with the dining room wall (above image) enough so that it's arrangement could become my regular Halloween Saturday Night thing...meaning I will probably set this wall up like this each year.  

For more on my Macabre Mausoleum explore these past posts:

Monday, October 17, 2016

Wreath of Shrouds

Welcome...
 Gaze into my crystal ball.
I sense you are seeking a super cheap Halloween craft involving trash bags.... No?
Well what kind of fortune do you expect to get from a Bargain Basement Spirit Board that has been exposed to the elements?!
I made this wreath several years ago (2012) and some how overlooked ever writing about it.  That year I made several Halloween crafts involving trash/recyclables: Spookerific Halloween Crafts.
This wreath truly encompasses the meaning of the word trash...being made primarily from black trash bags.

Here is the 'How-To" best I can remember:
Supplies 
Several Black lawn trash bags
Wire wreath frame
Wide Halloween ribbon

Start by cutting the black trash bags into strips.  Stretching and tugging at the edges will give them a gnarly look (this is good).  Tie the strips around the wire wreath frame.  Wrap ribbon around the frame and trash bag strips, leaving some of the strips loose.  Hot glue ribbon to hold it taut. Arrange strips to your liking, possibly trimming some to different lengths. Hang in a windy spot.
It's kinda entrancing watching the strips blow in the wind.  Hang weather resistant items (plastic skeletons, large bats or spiders) in the middle of the wreath if you don't happen to have an 
extra generic spirit board sign laying around.

I use black trash bags for crafts and parties on a fairly regular basis. I made a Halloween apron from a trash bag back in 2005.  I also used shredded trash bags to make a bat hall at PB's school in 2014.   I have used it to cover walls, windows, and other stuff in our house on several occasions to complement PB's Birthday party themes  (ex: The Bat Cave for his Vintage Comic Book Party and the Dead Marshes and Shelob's cave for his Lord Of The Rings Party). Black trash bags rank right up there with hot glue as some of my favorite craft supplies!

Saturday, October 15, 2016

Beware Of The Thing


It's always been a dream of mine to live in a big old creepy mansion like The Addams Family.


A homey and pleasant place.
Where you file the fence posts to sharp points to keep people out.


And instead of "Beware of the Dog" signs you have "Beware of the Thing".


Until I can acquire the old mansion I'll just have to make do with making my own sign for my current abode!


How To:
 I printed out an enlargement of the real sign (third picture from the top).  I then traced around the letters with a ball point pen to engrave their outline on a wood sign I picked up at the craft store.  I used my wood engraver to trace around all the letters to help them stand out.  Lastly I painted it with exterior grade craft paint and sealer.  Just hang the sign on the fence paired with one of those severed hands  from dollar tree!


Thing gives it his seal of approval.


Wednesday, October 12, 2016

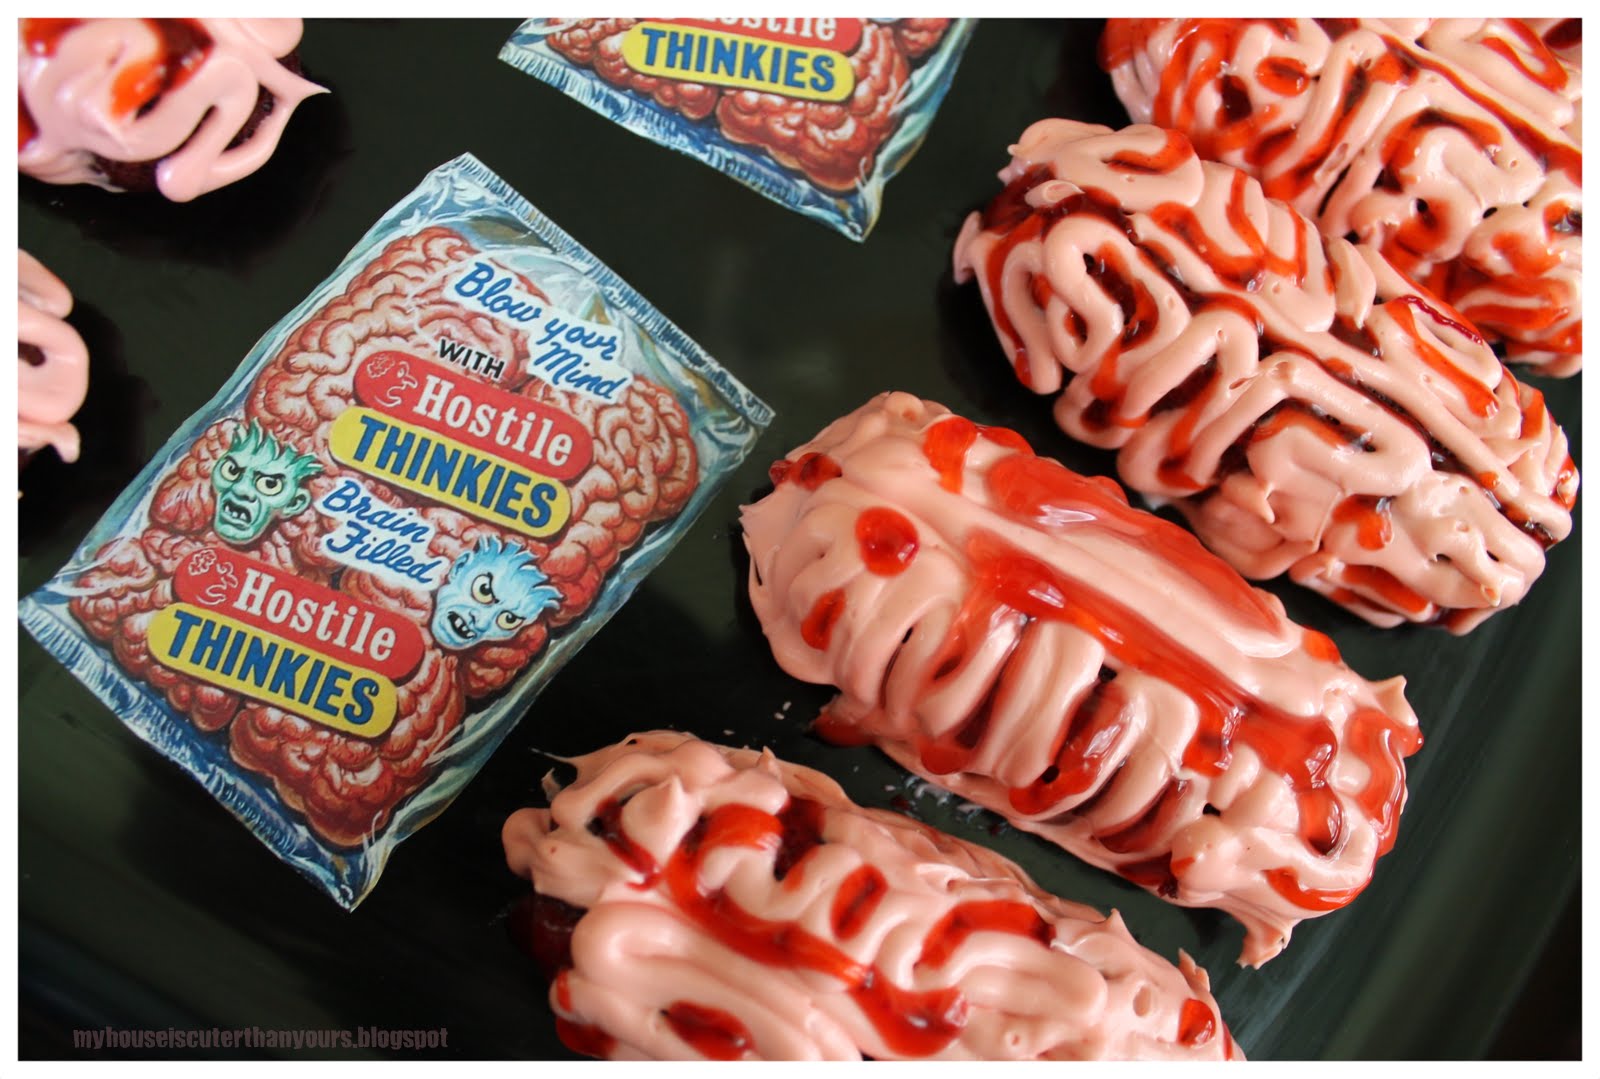
Hostile Thinkies


So excited to share these because this idea came from my own brain

Inspired by Wacky Pack Hostile Thinkies!


I bought a home version Twinkie Pan over 3 years ago around the time the corporation was going out of business.   I don't know.  Maybe I thought I would take over production with my 8 cake pan.  I really don't like the taste of twinkies but I do like ideas using their fun shape.


For this Halloween season I have been working on coming up with ideas (usually inspired by something vintage of course!) that are not the typical pinterest variety. If anyone else has made Hostile Thinkies inspired homemade brain twinkies I am certainly not aware of it.  


The How To:
Acquire a Twinkies baking pan (or use real twinkies).  Bake red velvet cake mix twinkies in pan.  Let cool.  Puree a can of cherry pie filling.  Inject underside of twinkies with some of cherry pie filling.  Decorate brain ridges on twinkies with strawberry icing.  Drizzle extra cherry pie filling in between ridges.

"Blow your Mind!"

Monday, October 10, 2016

Monster Maker


I know. The box says Mighty Men and Monster Maker, but I'm only here for the monsters!
Hubs got PB this 1979 Mighty Men and Monster Maker by Tomy several years ago for christmas. 

This vintage toy is the boy's answer to Barbie Fashion Plates but so much cooler!  It has several plastic plates with raised images of heads, torsos, and bodies along with some separate textures (fur, scales, ?, ??).  

It's easy to use: requires no batteries, no cords, and certainly no wi-fi.  Mix and match the plates together in the tray.  Place a sheet of paper over the top and rub across the surface with a black crayon.  Then go back and color in your creation with colored pencils.  Love it!  


I do wish it would have had some 'sold separately' plates offered.  The box says you can design hundreds, thousands, even millions of outrageous combinations...but I don't know about that.  There are really too many texture plates and not enough body parts ones.  Need more body parts!


"This could be the start of something weird..."
Ad from 1979 toy catalog.


But wait!  There's more!
Don Post and Tor Johnson

I was doing some digging around for research (the only saving grace of the internet) on this toy and came across some cool (hopefully true) stuff.  The artwork on the plates was done by Dave Stevens, a highly celebrated comic book artist who worked for Hanna-Barbera on The Super Friends in the 1970s but more notably created the comic character of The Rocketeer.  I also discovered that the monster hands shown on the box were made by classic horror mask maker company Don Post Studios.  Don Post Studios created the celebrated Tor Johnson mask which became the company's top selling mask of all time!  I'm a big Ed Wood\Tor Johnson fan so I was super excited to discover the Don Post tie-in with the Monster Maker.

Added bonus! I found the commercial: 

I have been really thinking about ways to have more monster plates for this set and then it hit me!  Pick up some barbie fashion plates at thrift stores and add them to the mix.  Barbie could have four tentacle arms or the Mummy could be sporting a fun two piece halter bikini outfit.   Now that would be truly scary!

Friday, October 07, 2016

New to the Tomb

Here are a few 'new to the tomb' vintage Halloween stuffs I have picked up over the past year. This is such a rarity for me.  When it comes to vintage Halloween pieces I am fairly limited in my collection...mostly light up blow molds and plastic jack-o-lantern pails, all of which I bought 15 years ago.  My main shopping venue, thrift stores, just don't have much.  Throw in that a bunch of my local stores have ceased selling Halloween items because it's the stuff of the devil.  Then additionally keep in mind that I am a cheap skate and will not pay collector prices.  But even within all of those constraints I have some pretty cool things.  
These 'new' items are mostly from one estate sale and a vintage shop in Brevard, NC called Underground Salvage Co.
Since I got so many neat things this year I decided to hang them up on my main wall in the living room.  In the above picture on the left is a super awesome treat bag, measuring nearly as big as a sheet of typing paper!    On the right is an Beistle accordion tissue paper appendaged scarecrow. Like my DIY Boo it yourself cat!

Beistle Skeleton accordion guy and a much smaller treat bag.  

Dennison die cut JOL with owly.  H.E. Luhrs (Beistle) owl.

Dennison witch and another Luhrs owl.


I am not sure of the maker of these small cardboard pieces but they are quite cute.

All of the things in the above pics (minus the Luhrs owls, those I have had for a while) came from a little paper sack I found in the back of a closet at an estate sale. Cost: 2 bucks for all of it.


I picked up these Dennison seals and Beistle place cards while in NC last Nov. setting up for Atom (Aluminum Christmas Tree Museum).  Because it was after Halloween, the prices on these weren't too bad (I think 6 bucks total).  I can definitely see them being used for some fun crafty stuff at some point.  I really love that witch and there's 12 of her in the pack!

Monday, October 03, 2016

Ouija Sugar Planchette Cookies

Last year when I discovered the Mystifying Oracles of Butter Rings, I started contemplating other ways to add more 'Ouija' to Halloween.   I had also bought this Ouija Board tray from Spirit Halloween around the same time and decided to consult it on the matter.

Tell me, oh great plastic ouija tray..what should I do?

"C-O-O-K-I-E-S"

Hmmmm...Cookies.  I know!
Planchette Cookies!


I think if it was a full fledged Ouija board it may have instructed me toward something involving demonic possession but luckily it has a culinary interest. 


I am so thrilled with how these turned out!

If your Ouija tray has been directing you to make cookies, here's how:
I started with a prepackaged sugar cookie mix.  I then used a large metal heart shaped cookie cutter that I bent a bit to make it less heart shaped and more planchette looking. For the viewing circle on the cookie, I punched it out with the open end of a plastic casing from a sterile syringe.  I happen to have medical stuff laying around my house but I am sure there is something round and small you have laying around your own home that will work just the same...maybe the lid to a spice shaker?  Next ice the cooled cookies with the recipe below. I got this icing recipe from one of PB's teachers 5 years ago and this was the first time I ever used it.  It dries perfectly smooth and firm. Perfect for drawing on! Next let the icing dry.  I let mine dry for 24 hours before drawing on the cookies, but I bet it can be done sooner. I then dusted the tops with cocoa powder.  I did this to make the cookies look kinda aged.  I think it could work even better by adding some cocoa powder to the icing recipe. Lastly, I used a food marker to write "Mystifying Oracle" and some sketchy lines along the edge.  The lettering is by no means perfect but I don't think it should be.  They are cookies, they are going to be eaten.  Why spend 20 minutes per cookie decorating it when it takes 20 seconds to eat it?

Let the spirits from beyond direct you in this endeavor!

Icing:
1 1/2 cup confectioner sugar
2 tablespoons milk

Sift sugar into glass bowl, add milk, and stir. 
 If icing is too stiff add more milk. 
 Spread on cooled cookies. 
 Icing will set when completely dry.


If you need even more Ouija in your life, meander around Museum of Talkingboards for history, facts, and examples of over 100 styles of talking boards and planchettes!

Sunday, October 02, 2016

Skellimingos at Ground Zero

                         
I have wanted a set of those skelingos/ skelemingos/ skellimingos/ skel-o-mingos for some time now.
 8 years I have waited...biding my time and money.  I am too much of a cheap skate frugal person to spend 30 bucks on a set.  

This year, the Halloween spirits have bestowed these graceful corpses upon me!
Behold the wonderment of Skull Flamingos!

And only 7 bucks each!

Flock your graveyard!
Available for a limited time HERE!

* Ground Zero is what PB called our backyard after it was invaded by at least 100 fire ant mounds over night earlier in the year.  We have since conquered the ants but have lost the battle of the weeds and thorny vines. 

Saturday, October 01, 2016

Screams of Joy!

The most wonderful time of the year is upon us!
HALLOWEEN!!!

I am planning a bunch of fun halloweenie stuff to share..... if the spirits don't drag me off!

Friday, September 23, 2016

Spud and the Gang


"I'll take the Mr. Potato Head set!" 
One of my favorite lines from The Andy Griffith Show episode: Aunt Bee, The Warden.
For my birthday this year, that's the line I used when asked what I wanted for my present. 

 Yay! Vintage 1952 Mr. Potato Head Set! Potatoes and anthropomorphic attributes kinda became my birthday theme this year.  Makes sense...Potatoes are yummy and everything is more fun with googly eyes.

Hubbs got me a super awesome collection of not only Mr. Potato Head but his usual gang of perishable vegetation: Oscar Orange, Pete Pepper, and Kooky Cucumber. Yes, I am aware that Pete is wearing a dress, heels, and lipstick...He's a transvestveg!

The kit was originally for making garden folks from actual produce. My collection came with all sorts of extra parts from other sets: eyebrows, mustaches, pipes, hats, glasses, and a wig for covering old lady Tater's bald head.

Also included in the box was this insert pamphlet about making "Spud-ettes" such as Bushy Bear and Dinkey Donkey.  The accessories for these guys didn't make it to my set sadly.   I really wanted to make that onion headed Piggly Wiggly.

While constructing these guys with their plastic bodies and pre-punched body sockets is "fun for every member of the family", I decided to try out the original idea of real fruits and veggies.
Here we have Ted "All Ears" Tangerine, Sinead O' Tater, and Andy Rooney Apple.

Shown within the 'How To" guide for making the Mr. and Mrs. PH was this birthday cake serving suggestion.  
Don't mind if I do!

As I mentioned earlier, I went with a potato theme for my birthday. My cake is make from sweet potatoes (recipe below) and I topped it with crushed potato chips. Spudarific!

(p.s. this plastic good luck cockroach is a guest not a pest)


I had a whole evening planned which involved wearing a potato sack dress.

Listening to The Ventures instrumental "Mashed Potatoes".

And gathering the gang for a good old fashioned potato peeling party!

But in the end I went with munching on a big bowl of tater tots and couch potatoed myself while reading " 250 Ways of Serving Potatoes".

Sweet Potato Cake with Brown Sugar Cream Cheese Frosting
Cake:
1 box yellow cake mix
3/4 cup milk
1/3 cup vegetable oil
3 eggs
1 1/2 cups mashed cooked sweet potatoes
1 1/2 teaspoons apple pie spice

Frosting:
1 package (8 oz) cream cheese, softened
1/4 cup butter, softened
2 1/2 cups powdered sugar
2/3 cup packed brown sugar
1/2 teaspoon almond extract

Heat oven to 350°F. Grease pan with shortening.
In large bowl, beat cake mix, milk, oil, eggs, sweet potatoes and apple pie spice with electric mixer on low speed 30 seconds. Beat on medium speed 2 minutes. Pour into pan.
Bake 34 to 38 minutes or until toothpick inserted in center comes out clean. Cool in pan on cooling rack, about 1 hour.
In medium bowl, beat cream cheese and butter with electric mixer on medium speed 2 minutes or until creamy. Beat in powdered sugar, brown sugar and almond extract until desired consistency.  Frost cooled cake.  Store left overs in fridge.  Optional toppings: Crusted potato chips or crisp cooked bacon. 

Here are several links to my past posted birthday shindigs:
Pee-wee Partypalooza
Birthday Hoopla Light Bulb Baking and Cockroaches and Cake
Giving a rat's ass Bday Cake
Yadhtrib Aknow and Snozzberry Birthday Cake
Monday, September 19, 2016

Lunch Time Ring Side!


Wrestling has been 'the thing' between PB and Hubbs for a long time and fairly constant over the last 8 years. PB has a storage bin full of wigs and hats and other dress up stuff that he uses for his many personas. When PB was little (5 years old) he came up with his first character's name (The Green Gobbler) with matching appropriate outfit (a green Mexican wrestling mask and a big plastic gold chain) on his own.  Generally Hubbs is also required to don a get-up from his supplies as well.   PB would then have Hubbs bring the bedroom mattress into the living room for the Smack Down challenge.
  
Recently it's been Wrestle Mania at our house again due to some new video game PB and Hubbs play together.  I am not into video games but I do like that this particular one is introducing him to the classics like Rowdy Roddy Piper and Andre' the Giant.

I decided to turn this mutual interest into something crafty. Even though PB is in middle school he still likes for me to put little lunch note kinda deals in his lunch bag.  I try to make them fun and relate to something we have experienced in the recent.  Last Halloween I made a little future telling magic 8 ball container that held inside a 'Yes, No, or Maybe' cookie (Mystifying Oracles of Butter Rings) to reveal his answer.  I also made a Nightmare Before Christmas Oogie Boogie Treat Holder.  Another time I wrote out David Letterman "facts" like "The refrigerator, the microwave, and the Slurpee machine were all invented by fat guys."  I tend to steer clear of those boring printables from online that say "Dream big today!".  PB and I actually make fun of that sooo maybe I will have to do those in the future...with stickers of rainbows and puppies on them!  Ha!  File that one away for later!

Back to wrestling.  For this fun lunch bag deal I went with the idea of collecting trading cards of various cool wrestlers from yesteryear! Seen below between Cactus Jack and The Million Dollar Man is the little pocket folder I made to hold the cards.  I put a printed vintage image depicting a pack of trading cards on the front and back.  I then laminated it for moisture protection.  Each day for the next few weeks I will add a new printed trading card to the folder.

Collect Them All!!!
 Jake the Snake!  George "The Animal" Steele! Junkyard Dog!

  A couple of years ago we actually rode in an elevator at the Los Angeles airport with The Million Dollar Man!  We also got to meet Sargent Slaughter and Hacksaw Jim Duggan at a convention around the same time. PB's all time favorite wrestler is Mick Foley....and Ladies and Gentlemen! Mrs. Foley's Baby Boy is going to be at a comic convention next year in a city near us!!


To make this little fun pack it's really simple, as you may have guessed:
Everything is just printed paper of images from the internet. I made the pocket folder from cardstock.
Print, Cut, Trade!


When I was a kid growing up I LOVED WWF wrestling!  I always watched the Rock n' Wrestling cartoon on Saturday mornings. I have a feeling the cartoon is probably not as great as I remember it though.   I may try to talk PB into watching it with me.  Only he isn't as easily entertained as I used to be at his age...or even my current age!


Example: I have watched this commercial about 10 times in a row and could do so several more times.  I love it!